The Undercover MacBook

For someone in possession of a stolen computer it is no longer enough to look over their shoulder while using it, these days the computer itself can turn informer and lead the police straight to them.

This summer I had my MacBook Air stolen from a hotel room while vacationing in Las Vegas. Along with the machine, roughly 1500 photos taken during the preceding three week road-trip through California and Nevada were gone. Thanks to my heavy reliance on the cloud storage service Dropbox I lost almost no other data, despite having used this as my main machine for the last couple of months. I would have been devastated had I for example lost the source codes to my apps.

I promptly made a report of the theft to the Las Vegas Metro Police Department where they let me know, in no uncertain terms, that I should not expect to see my computer again. They did however assign a detective, one Russel Lee to the case.

A Ray of Hope

Despite the Police's pessimism, I maintained a ray of hope. After buying the laptop I had invested in a piece of software called Undercover to keep my MacBook safe. Described as a “revolutionary theft-recovery software” it would supposedly provide me with all the information needed to recover the computer in case it was ever stolen.

Using my iPad I logged on to the Undercover recovery center website and marked my computer as missing — telling the software to start tracking it.

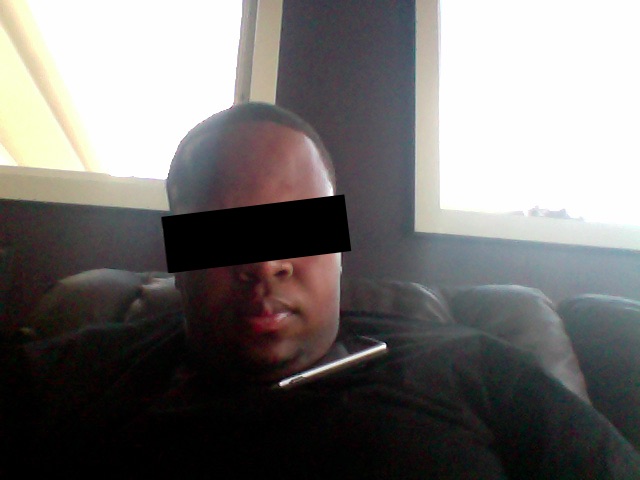
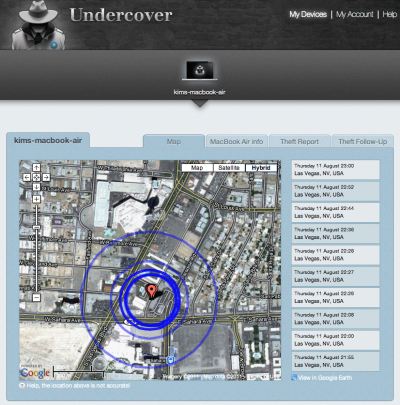
Things were quiet for several days. I had already made my way back to Sweden and the ray of hope was starting to fade when I finally received an e-mail proclaiming that the computer had been used to access the internet and that Undercover had started tracking it. As promised, I was provided with webcam photos, screenshots, the computer’s IP address, and an approximate location!

I could see that the person using it had logged in to the computer’s guest account and had connected to a Wifi network. While it’s no fun seeing someone using your computer without your consent, I was nevertheless relieved that the tracking software seemed to be working.

Hello there, what are you doing with my laptop?

Oh, you’re hitting up women on Facebook. Carry on then.

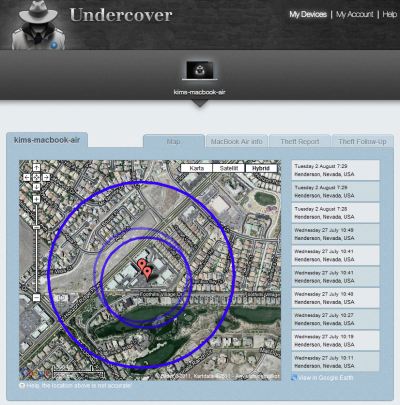
The location in Henderson, Nevada, wasn’t exact enough for the police to figure out which house to visit. Frustratingly, I also found out that it takes the police all of 60 days to get the subscriber information for an IP address.

Profiling the User

During the following weeks I was informed whenever the computer was used and I tried to piece together the information I could gather from the screenshots in an effort to point the police in the right direction. I quickly found out the user’s Facebook profile and Skype account, but he used the alias Dee Macc and I couldn’t figure out his real name and address. His Facebook profile did mention that he graduated from LA High class of 2007, so that prompted a search of their online yearbook, alas to no avail.

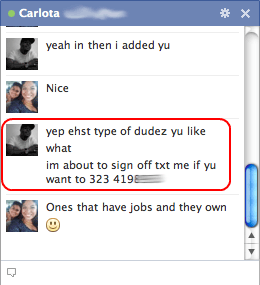
Eventually a bit of luck, he typed his phone number into a couple of chat windows while trying to pick up women. But according to whitepages.org the number he gave is registered to a 60 year old person in Los Angeles. Not the age you would expect of someone who uses the phrase “im not no baby yeah”. Also, according to his Facebook profile Dee Macc was born on February 5th 1990 making him 21 years old. Thus, the registered owner of the phone number is definitely not our man.

It looked as if my machine was making lots of new friends as other people also started using it now and then, always from the same location in Henderson, NV. Some of their Facebook profiles were under their real names. One of those people, let’s call him B., turned out to be the owner of a Las Vegas boxing gym near Las Vegas Boulevard. Another user was his son D., whom I could tell from his Facebook account is a promising young boxer.

As time passed and more information came in I forwarded everything to the police, but they still didn’t have enough to take action.

The Retrieval

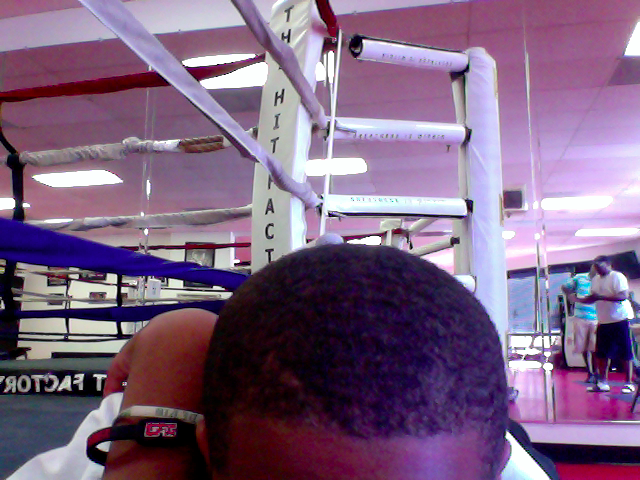
One late evening as I was ready to turn in for the night I was alerted by Undercover that the computer had moved to a new location. At first I thought this was bad news since it meant the IP address subpoena would have to be restarted from scratch, but I couldn't have been more wrong. The location was reported to be close to Las Vegas Boulevard, and the webcam photos showed D. hanging out in a very nice boxing gym. For the first time in weeks I knew exactly where it was!

I sent a quick e-mail to Detective Lee.

New and actionable information.

D. XXXXX is at the time of me writing this using the computer at the XXX XXXXXX Boxing Gym, XXXX Paradise Road, Las Vegas.

I had a reply just minutes later

Perfect! Thanks, I’ll run over there and see.

As webcam photos continued to come in over the next few minutes, I forwarded them to Detective Lee to help him find the right people in the gym. Then all of a sudden the computer went offline. A worrying turn, but I maintained hope as the last screenshot contained an intriguing Facebook update.

“ugghhh i hate police officers…makes me wanna qweef”

Moments later the e-mail I had been hoping for arrived from Detective Lee.

I have your computer! Good Job!!

High fives all around! The Undercover software had delivered on its promise, and combined with the swift action from Detective Lee it had recovered my MacBook Air.

Conclusion

As I’m writing this I have just taken delivery of the computer from the Las Vegas Metro Police Department evidence vault, and I was glad to see my road-trip photos remain safely stored on the disk. Detective Lee had already mentioned that my user account was still on the computer which lead me to believe they would be there, but it’s good to have it confirmed.

After 10 weeks of being separated from my computer I can finally get back to app development and get som delayed updates out the door — once I'm done organizing the road-trip photos of course.

Lessons learned

I was lucky in having been sufficiently prepared before having my computer stolen. Take these lessons to heart, should it happen to you;

  • It’s a good idea to take the precaution of having theft-recovery software installed on your computer.
  • It is vital to have your computer’s serial number available when filing the police report, without it you may not be able to legally prove it’s yours even if you are able to track it.
  • Set up a guest account so the thief can log in and connect to a network, or tracking will not work.
  • Lock your user account whenever you step away from the computer so that a thief can’t access your files and won’t have administration privileges to the system.

This ordeal has made me consider taking a couple of additional measures now the computer is back in my possession.

  • For insurance reasons always make use of the hotel in-room safety box, no matter how insecure.
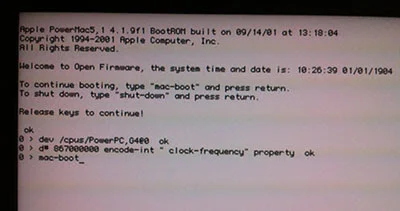
  • Set a firmware password, a simple measure which will make it impossible for a thief to wipe the system and reinstall the operating system, thus removing the tracking software.
  • Install some software to allow me to siphon off data in the background so that I could have copied over my photos while the computer was connected to the internet but not under my control.

Undercover is available from Orbicule. I highly recommend you install it on your Macs.

Excerpts of collected evidence

Below are some of my favorite screenshots and webcam photos selected from the huge amount of data I received from Undercover during this episode.

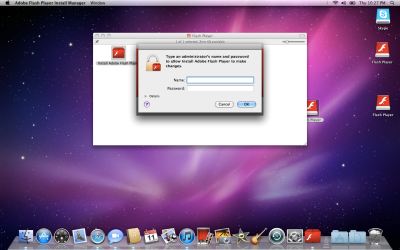
Installing Flash? Not on my computer you don’t!

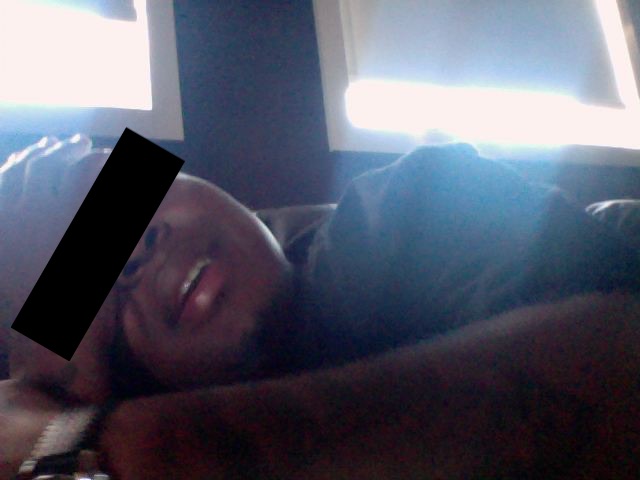
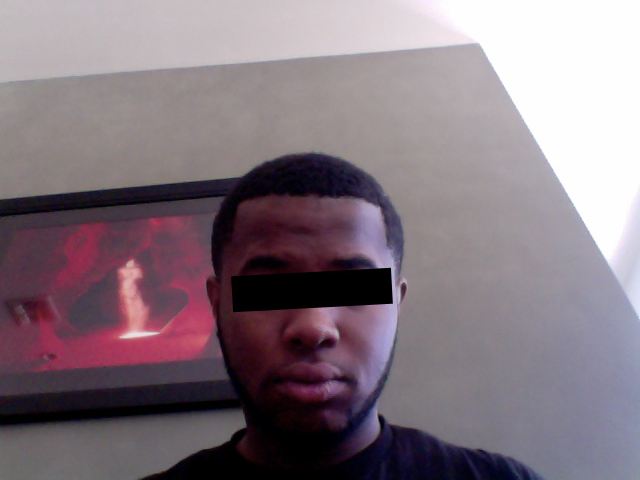
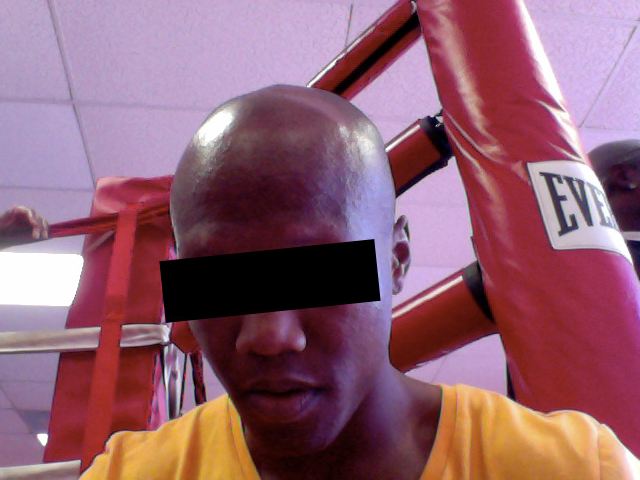
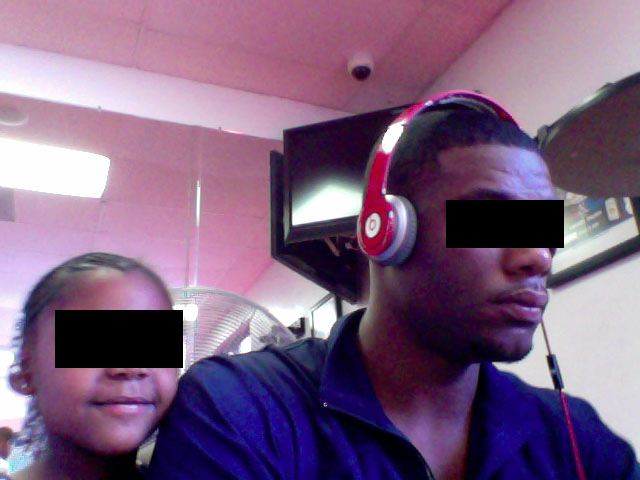
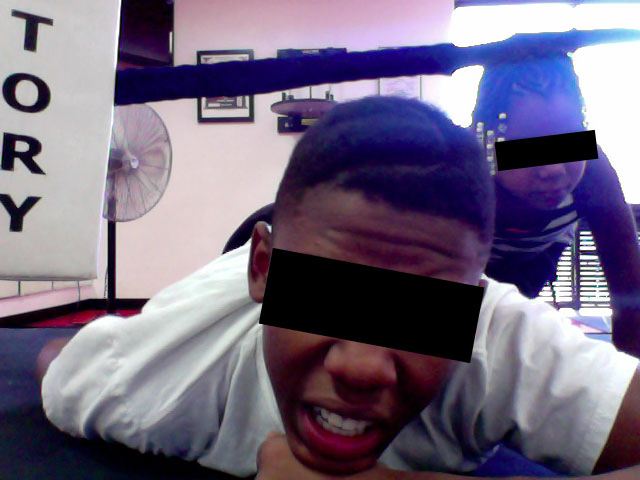
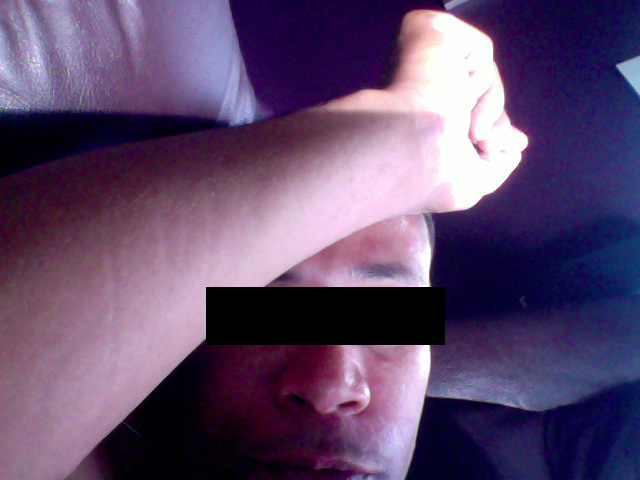
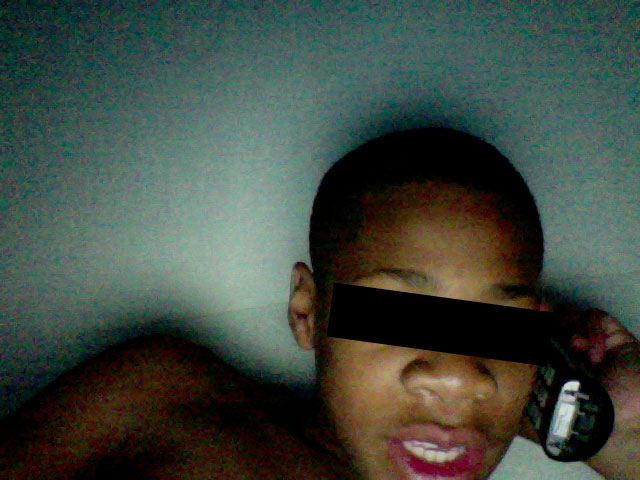
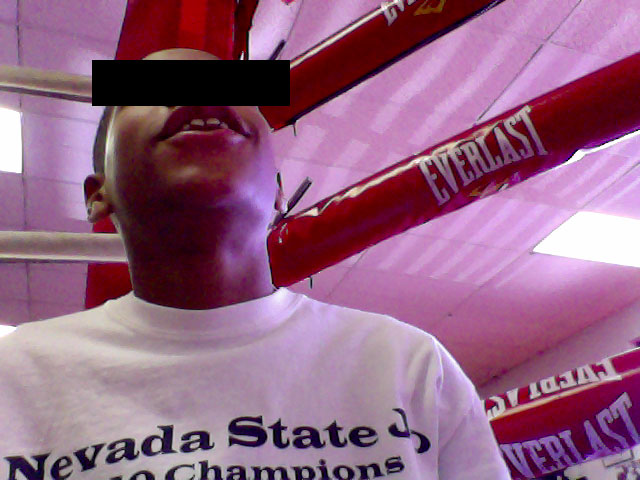
Some webcam photos of people hanging out with my MacBook Air.

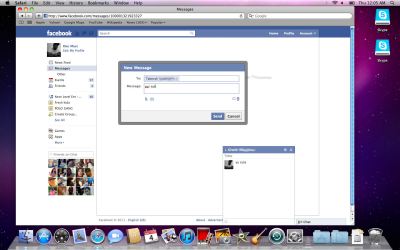
“yu cute” — Dee Macc using the shotgun approach on Taberah and Gisele.

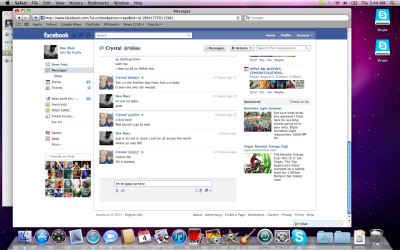
“im not no baby yeah” — Dee Macc's failed attempt at sounding mature.

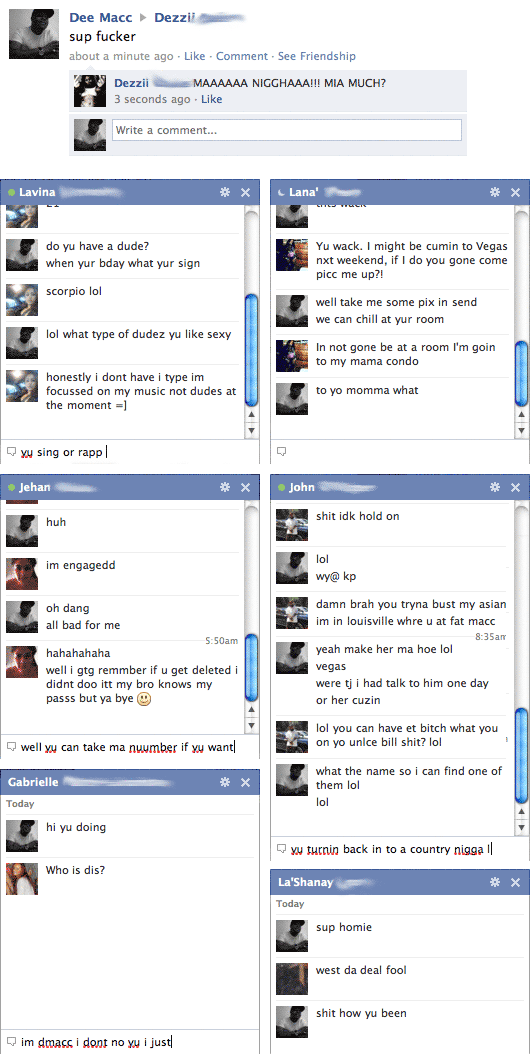
Fine prose from Dee Macc and friends.

Installing Leopard on the G4 Cube

The PowerMac G4 Cube, arguably the coolest computer on planet Earth, is not supported by operating systems later than Mac OS X 10.4 Tiger, but there are many reasons you may want to run a later system. For me the main incentive to upgrade was that Apple dropped Tiger support with the release of iTunes 10, which means a Cube on 10.4 can not partake in the wonders of Home Sharing.

The minimum system requirements for installing Leopard on a PowerPC based Mac is an 867 MHz processor and 512 MB of RAM. The memory requirement isn't really a problem since the Cube supports up to 1.5 GB, and you wouldn't want to run Leopard on any less than 512 MB anyway. The processor speed requirement, however, is a problem since the fastest (unmodified) Cube runs at 500 MHz. Luckily there is a way to fool the Leopard installer's system requirements check by temporarily modifying the processor speed reported by the firmware.

Back up your Tiger

First off you'll want to create a bootable backup of your internal disk on a firewire drive. Do this using SuperDuper! or a similar tool, and make sure you can really boot from the backup drive.

No really, do not go on until you have successfully booted from your backup and made sure it works.

Set the startup disk

Put your Leopard installation disk in your DVD slot, or copy it onto a firewire drive if your Cube can't read DVDs. Then set the installation disk as your Startup Disk in the System Preferences so that on next restart your Cube will boot from it and start the installation.

Modify Open Firmware

Restart your Cube, and hold Cmd-Opt-O-F during boot to enter the Open Firmware prompt. You will now temporarily set the reported CPU speed to 867 MHz and then continue booting. To accomplish this you will type some commands on the prompt, Open Firmware will respond with an 'ok' message after each understood command. The reported speed will revert back to the original value after next reboot.

For single CPU systems type the following three commands exactly as shown.

dev /cpus/PowerPC,G4@0

d# 867000000 encode-int " clock-frequency" property

mac-boot

For dual CPU systems use the following five lines.

dev /cpus/PowerPC,G4@0

d# 867000000 encode-int " clock-frequency" property

dev /cpus/PowerPC,G4@1

d# 867000000 encode-int " clock-frequency" property

mac-boot

Continue with the installation normally, and eventually end up with a Leopard Cube.

Thanks to MacRob on CubeOwner.com for turning me onto this solution.

Retro gaming on iPad, for iOS developers

MADTV and Gabriel Knight running in dospad on the iPad

MADTV and Gabriel Knight running in dospad on the iPad

Sometimes it's good to take a break from coding, and what's more relaxing than running some retro games on your iPad?

Getting DOS onto iPad

Some time ago a DOS emulator called iDOS briefly made it into the App Store, but it was already long gone when I heard of it and tried to download it. As luck would have it the source code for the app is available under the name dospad from Google Code, so any registered iOS developer can build it using Xcode and run it on their iPad.

I believe iDOS or dospad is also available for jailbroken iPads, for those who are not registered developers but are OK with jailbreaking their device.

Installing games

With dospad you get a fully functional DOS system for your iPad. There is mouse support and sound support, making it brilliant for some retro gaming. If the games are mouse driven you can even go full screen for a very immersive experience.

Sierra's adventure game Gabriel Knight is one of my all time favorites, and since I no longer have a floppy disk drive on my computer I downloaded it from an abandonware site called The House of Games, where there's a large selection of old DOS games.

With dospad installed on your iPad, you can drag files into it using iTunes. Just go to the iPad's Apps tab and select dospad under the File Sharing header.

Dospad comes with an unzip utility so once you have transferred the zip file with your game you can use the DOS command prompt to create a directory and unzip the file into it.

For Sierra games you then run install.exe to select your sound options. I selected Soundblaster Pro which seems to work well.

Launch the game by running sierra.exe.

Mouse controls

Obviously, this being DOS, you don't use it like a standard touch screen. Instead you control a mouse cursor on screen in the same manner you would using the touchpad on your Macbook. Tapping the screen left clicks at the position the cursor points to.

You can play either in portrait or landscape mode, as well as full screen.

Happy retro gaming, and make sure to save your game often.

Starting 11 for iPhone in HD

It has yet to be listed in the App Store, but I'd like to introduce you to my latest effort. Starting 11 is an app developed for the ongoing FIFA World Cup.

You choose which team you want to manage and position the players on the pitch in the formation you prefer. You can then share the resulting lineup via e-mail or Facebook.

Starting 11 has been in review at Apple for a over a week already so it should hopefully go live shortly.

Retina Display ready

This is my first attempt at an app supporting the full resolution of the Retina Display of iPhone 4. The difference in detail level is simply astounding, as you can see for yourself below.

Click the image for full size comparison.

On the iPad App Store from day one

I have just learned that my first iPad app has been approved by Apple and will be available from the App Store on opening day.

A Memory Game gives you the opportunity to practice your memory by trying to find and match pairs of cards together. The first version features the two card decks Flags and Symbols.

Once the store is online you will be able to download A Memory Game for free [iTunes link].

iPhone Video Output

There are a couple of options available when preparing to perform a demonstration of an iPhone app to a larger group of people. All these options have flaws, however. The "gather around" method, for example, doesn't work well for groups of more than a few people. Any more and you would ideally want to project the iPhone screen contents onto a big screen.


The "iPhone simulator method" is probably the most used method. It's simple to set up but limits your app navigation to the mouse, making multitouch gestures difficult to perform. Also, there is no way to show off accelerometer functionality like "shake to undo".
The "camcorder method" avoids the simulator's issues, but can be a hassle to set up. It also restricts your movement as you have to make sure to keep the device on screen and avoid reflections as best you can.

Doing it Steve's way
Why don't we take a page out of Steve Job's playbook and mirror the iPhone screen directly from the device onto the big screen?
Sadly this is not straight forward. So far only the iPod application supports video output via Apple's AV cable, at least that's what I thought until I stumbled upon Rob Terrell's iPhone App Video Mirroring blog post (go read it now, I'll wait).

Using the private MPTVOutWindow class in the MediaPlayer.framework API, Rob's code mirrors the iPhone screen onto the AV cable. For demonstration purposes this is a great solution, but being based on a private API it should not be left in the app when submitting it to the App Store.

Originally the code did not support on-the-fly orientation changes and touch indicators, both of which I needed. Thanks to Rob posting the source code I was able to implement these changes and have since submitted the updated code back to him, although I haven't heard back after doing so.

Get your hands on the code
In the spirit of sharing I have prepared a sample project, TvOutputSample, which shows you how to add video output to an Xcode project. This is the application shown in the video above, it should build and run out of the box, using iPhone SDK 3.0.

Download the code: TvOutSample.zip
[UPDATE: The project has moved to github]

I should mention that since the video mirroring is software based it affects application performance somewhat. On an original iPhone 10 fps works well, on an iPhone 3GS I have had no problems running at 20 fps. The fps setting is near the top of the UIApplication_TVOut.m file, do your own tests to see what works best for your app and hardware.

The current version (as of October 2009) of the code does not support OpenGL video output.


Hiragana, Katakana and the WWDC Wall of Apps

At WWDC there was a really cool wall of apps, which used 20 Apple Cinema Displays to show the icons of the 20,000 most popular iPhone apps, and illuminate them whenever they were downloaded from the App Store. Pretty neat!

Greg Pascale, a student at Brown University, made a Photosynth of the whole wall, allowing us to study it in detail. I took the opportunity to look for my applications, and found them at the far right of the wall.

I can hereby claim having had a presence at WWDC '09. Sweet!

Analyzing App Store sales for 2008

Way back in October I wrote a post analyzing the sales data from the first three weeks of my applications in the App Store. Things were looking good, with over 250 sales in those three weeks.

Now that we're a little bit into 2009, it's time to take a look at how the sales performance evolved over the rest of 2008. Interestingly the combined sales of the 13 weeks since my previous report have failed to even equal those of the three initial weeks.

Click the images for higher resolution.

Sales Growth

All in all my two apps, Hiragana and Katakana, racked up a total of 467 sales during 2008. As can be seen the sales have leveled off to just a few per week, it will be interesting to see if the release of the free Hiragana Lite has any effect going forward.

Biggest Markets

Like before just under half the sales were generated through the US App Store, with Germany coming in second.

Payout

So far the sales have generated the following payouts:

$ 609

€ 207

¥ 5690

It seems Apple don't strictly follow the $250 minimum revenue per region rule before paying out. The Japanese amount above is way less than $250, and the dollar amount actually includes three separate payouts of $430, $91 and $88 respectively.

Phil Schiller and the case with the missing menu bar [Updated]

I just watched the video stream of Phil Schiller giving the Macworld keynote presentation.  I am as usual hugely impressed with the software Apple churns out, this time the addition of face detection and recognition to iPhoto was my personal favorite new feature. Look out Phil, $79 is coming your way.

The one thing, though, that stuck in my mind more than anything about the presentation was the mysteriously missing Mac menu bar in the demo of the new iWork.com service.

First Phil prepared a document for sharing using Pages on his computer.

Phil with the menu bar

Phil with the menu bar

He then switched to the fictional user Tia's computer to show us what she would experience on the receiving end. Tia's computer however didn't have the Mac menu bar at the top of the screen.

Look, no menu bar

Look, no menu bar

I have had a slight look around to figure out how to hide the menu bar in Leopard, but to no avail. This begs the question, can it be done or was Phil not using Leopard in the demo?

By the way, good news about all iTunes songs being DRM free! Finally I can commence my long planned iTunes shopping spree.

UPDATE: The iWork.com demo starts at 1.01.20 into the video stream.

En route to Atlanta for the Cocoa Bootcamp

I'm just now at the airport, waiting to board the plane which will take me to Atlanta and the Cocoa Bootcamp. This is a trip I've been looking forward to for over a year.

I have prepared for the course by reading most of Aaron Hilegass' book Cocoa Programming for Mac OS X, and of course by meddling with iPhone development. But I have always found it easier to learn by interacting with knowledgeable people, so this will be my big chance to really get to grips with the parts of the Cocoa framework which I haven't been able to grasp. 

The Interface Builder has been my biggest stumbling block so far, leading to me writing all interfaces in my iPhone applications in code. So I hope to come away from this week with new insights into how it's supposed to be used. Interface Builder is a very different beast compared to the .NET Visual Studio experience I'm used to. However, I fully expect it to be superior once I can wrap my mind around it. It is an Apple product after all.

Judging by his book, Aaron has a knack for systematically introducing progressively more complex concepts in a very clear and easy to follow manner. I thoroughly recommend his book to anyone new to Objective-C and Cocoa. I think I may be able to finish it during the flight.

I'll summarize my experience at the Big Nerd Ranch in an upcoming post.

Analyzing App Store sales data

I am currently selling two applications on the iTunes App Store. Hiragana and Katakana are educational applications aimed at the novice students of the Japanese language. Hiragana and Katakana are also the names of the two Japanese character alphabets my applications focus on.

Apple provides sales data for applications sold via the App Store, but the data is presented in the most unintuitive way possible, as plain data tables. This makes it extremely hard to get a view of sales performance, so I dropped the data files for my first three weeks of sales into my favorite data analysis application and ended up with the following insights. Click the images for higher resolution.

Sales Growth

Hiragana was first available for download from the App Store on 20th of September, with Katakana following on the 27th. In less than three weeks 266 units have been sold with Hiragana representing the majority of sales. The last week had the highest sales with a combined 126 units, 71 of which were Hiragana and 55 were Katakana.

Biggest Markets

Close to half of the sales were in the US market (122) with Germany, Canada, Japan and Australia being the other regions with more than ten sales each. The long tail of stores selling less than ten units represents 85 sold units, with 11 stores clocking in at one sold unit each. I doubt I'll ever see any profits from those markets as I need to sell approximately 100 units in a store to reach Apples minimum amount of $250 for royalty payout.

The information above is based on the weekly stats reported by Apple. Apple also provide daily statistics, but you have to grab them while they're fresh, only the last 7 days are available. I was out of town for a little over a week and forgot to download a few days worth of data. Going forward I'll try to store every day and return with a more detailed analysis. It should be interesting to se the daily trends. I would expect weekends to lead the sales since that's when people may have the extra time to play around with their iPods and iPhones. We'll see.

Published on the App Store: Hiragana

My first iPhone/iPod Touch application, Hiragana, has been published on the App Store. Apple's review of it took less than a week from submission to publication which did catch me off guard, as I was hoping to have more time to prepare a webpage for its launch.

Hiragana is a flash card application which helps me, and hopefully others as well, take advantage of occasional down time during the day to study the Japanese hiragana characters. 

You can slide the cards left/right to flip through them. There are 104 character cards in all, plus one information card which functions as the application manual.

Sliding the card upwards reveals the pronunciation of the character.

A double tap zooms the card out to fit the whole card on screen, and presents a card removal button similar to the ones in Mobile Safari's tab view.

The cards can either be studied in order or in randomized order. This is toggled by tapping the crossed arrows in the lower left corner.

The i-button in the lower right flips the view around and allows the customer full control over which characters to include in the card set. 

The application makes use of Core Animation to provide a very smooth and pleasant user experience.

Hiragana is available now for $3.99, all feedback is appreciated.

A version of the application focusing on the Katakana characters has also been submitted, but it is still in review.

Running SDK apps on a jailbroken 2.0.1 iPhone [Updated]

Update: There is useful information in the comments about how to do this with later versions of the SDK as well. Thanks to everyone who has contributed. 


This summer I've spent some time working on my iPhone app, which I hope to release on the App Store later this fall.

Since I imported my iPhone from the USA, I have to use the iPhone Dev Team's Pwnage Tool to unlock and jailbreak it. I chose to stay on firmware 1.1.4 until 2.0.1 was available to avoid the performance issues that were widely reported. This means I have not had the opportunity to try my application on the phone itself, but last night I updated to 2.0.1 and tried installing the app.

It turns out my application works great, but I still need to add a few more features and spend some time generating nice visuals to replace the placeholder graphics I am using.

To get the application running on the iPhone I had to copy it using scp to the /Applications directory on the phone and bypass the iPhone Code Signature check. After some googling I found the ldid tool written by Jay Freeman, which takes care of the Code Signature.

Here are the steps I used to get my SDK developed app running on a jailbroken iPhone, all commands should be entered as one liners in the Terminal:

1. Make sure you set Xcode to compile for the device, not for the simulator.

2. Compile the project, then copy the resulting MyApp.app directory to the iPhone's /Applications directory.

mac# scp -r MyApp.app/ root@iphone_ip:/Applications/

3. Access the phone using SSH. The root password is alpine, at least on my phone.

mac# ssh root@iphone_ip 

4. Make sure the executable is marked as such, this step is probably unneccessary but it wont hurt anything.

iphone# chmod +x /Applications/MyApp.app/MyApp

5. Install the ldid tool, this step probably needs Cydia to be installed on your phone.

iphone# apt-get install ldid

6. Run ldid on the application executable on the phone.

iphone# ldid -S /Applications/MyApp.app/MyApp

7. Your application icon should now turn up once the phone is rebooted.

These steps will work even if you have not been accepted to the paid iPhone developer program.

Note that these instructions are experimental. I can't be held responsible for whatever happens if you try them.

iPhone App Store and the IRS - a study in frustration [Updated]

I decided to spend my friday afternoon setting up all the necessary information in preparation for selling my applications on the iPhone App Store. Since I am based in the EU, not in the US, I ran into a brick wall of trouble.

Once logged into the iTunesConnect system all seemed very straight forward. Since I watched the Publishing on the App Store video that Apple released on iTunes yesterday I knew I had to sign a contract, so I clicked the Contracts, Tax, & Banking Information link.

I then chose to add a new contract for Paid Applications to my account. There are three necessary steps, so I start by filling in my contact information. Not a problem.

Bank Info

I then need to supply Bank Info, like the name and address of my local bank. So far nothing troublesome at all. I also need to provide:
Account Name
Account Type
Branch/Branch ID
Account Number
Account IBAN
Bank Swift Code
Sort Code (UK) / SIC (SZ)

Here things were getting a little hairy, but I was able to figure everything out. My bank actually provided a convenient account number to IBAN converter and the Swift code (althought they call it a BIC code) on their website.

Tax Info

Finally I just have to add my tax info to the contract and I should be ready to go. But as it turns out, this step requires filling in something called Form W-8BEN and involves the IRS. I have to provide a US Taxpayer Identification Number, so I start exploring how to obtain one of these magic numbers.

As I am registered as an individual I need either a Social Security Number (SSN) or an Individual Taxpayer Identification Number (ITIN). I don't think I qualify for a SSN, not being a US citizen and living in Europe and all, so I start reading up on getting an ITIN. As it turns out this will take six to eight weeks and involves filling out another form, form W-7.

As forms go it is actually pretty good, only one page long. But reading the instructions it seems I have to send it in with my passport, not a copy mind you, the original passport. They promise to return it to me in 60 days.

Now, I'm not about to put my passport in an envelope and send it off across the Atlantic any time soon. I need it for my vacation this summer! I'm actually a bit disappointed as I was hoping to be able to start selling applications on the App Store in July. I just feel this could have been handled easier.
Apple Inc. does have a presence in the EU, so how come I have to register for an american tax number anyway?!

Getting an ITAN is a PAIN

Peter Nixey also notes the trouble getting an ITIN in his article about moving his business to the US:

You can’t get an Social Security Number SSN without being a US resident which means instead getting either an EIN (Employer ID Number) or an ITIN (Individual Tax Payer Number) both of which are a PAIN.
To cut a long story short, despite our best bureaucratic wrangling we were unable to attain ITINs. As if from nowhere though, an EIN popped out of a random conversation we were having with an official who it seems we charmed / confused into co-operation. It seems out that EINs actually require almost no paperwork and that the main thing required is persistence.


Quoted from Coming to America: Getting visas to do business in Silicon Valley

For me getting an EIN is not an option as I don't have a company. Although those numbers seem to be only a phone call away.

UPDATE: This turns out not to be true. After reading up on the SS-4 form for applying for an EIN it turns out foreign (non US) individuals can apply for EIN to comply with IRS withholding regulations. So I called the number (+1-215-516-6999) and ended up with an EIN in just 5 minutes. Very convenient, I just wish Apple had made this more clear on their application site.

iPhone Developer Program == profit?

So I decided to apply for the iPhone Developer Program to add some preassure for quickly learning Cocoa. It took maybe three days from sending in the application until I received the activation code from Apple. All in all a very smooth procdure.
Now I have to start drafting up a few iPhone applications to launch this fall on the AppStore. I'm quite excited about the possibilities, maybe I can even earn some money?

Bought an iPhone, thinking about security

So I've been away for a week doing a presentation at a user conference in San Francisco. While there I dropped in at the Apple Store across the street from the hotel at least twice per day, attempting to purchase an iPhone. They were constantly sold out.
I even tried at the AT&T store, but they demanded I sign up for a contract in order to buy the unit.

On my third attempt on the day before leaving town lady luck gave me a break. The Apple Store had just gotten a small shipment of 16GB iPhones, and I managed to grab the second to last one in the pile! After running the spectacular Pwnage Tool from the iPhone Dev Team I was able to use the phone with my SIM card. Compared to my earlier cell phone, a Linux based Motorola A1200, it's like being transported five years into the future with the flick of a finger.

Now to my security concerns. I have installed the OpenSSH client and server package, and am somewhat worried about the root password of all iPhone's being public knowledge. (It is alpine by the way.) If someone is able to find my IP address they could easily ssh into the machine as root and totally wipe my phone!

I know I can change the password by logging in as root and running the passwd command, but I worry that changing it will screw up the functionality of the device in some unforeseen way, rendering it an iBrick. Maybe Apple have hardcoded the password into some of the functionality of the device.

I love my iPhone a little too much to risk trying to change the password at the moment, but once the first crush wears off maybe I'll build up the courage and give it a try.

(posted from my iPhone)

An introduction

Okay, so here's the deal.

I am a full time Windows application developer for a multinational software company. I love my job, I really truly do.

But. It's purely Windows and .NET.

In the last few years I have migrated my private life over to the Mac. My only regret is not making the move sooner, Macs are just the most amazing machines.
Being a developer I am obviously interested in learning about Mac-development using Cocoa, Objective C and Xcode, but I have had a hard time finding the time to really get into it. I hope starting this blog to keep a journal of my progress will help push me along.

Obviously, since I have plenty of experience of C# and Java I will look into Mac development using those languages as well and type up my experiences right here. Hopefully it will all add up to a collection of interesting tips and thoughts on software development on the Mac.

I am keeping this blog mostly for my own sake, but feel free to drop by to read my musings, and do drop me a comment with your best Mac tips and tricks. 

Oh yeah, I do have another regret; not buying huge amounts of Apple stock once I realized how amazing Apple's products really are.