Installing Leopard on the G4 Cube

The PowerMac G4 Cube, arguably the coolest computer on planet Earth, is not supported by operating systems later than Mac OS X 10.4 Tiger, but there are many reasons you may want to run a later system. For me the main incentive to upgrade was that Apple dropped Tiger support with the release of iTunes 10, which means a Cube on 10.4 can not partake in the wonders of Home Sharing.

The minimum system requirements for installing Leopard on a PowerPC based Mac is an 867 MHz processor and 512 MB of RAM. The memory requirement isn't really a problem since the Cube supports up to 1.5 GB, and you wouldn't want to run Leopard on any less than 512 MB anyway. The processor speed requirement, however, is a problem since the fastest (unmodified) Cube runs at 500 MHz. Luckily there is a way to fool the Leopard installer's system requirements check by temporarily modifying the processor speed reported by the firmware.

Back up your Tiger

First off you'll want to create a bootable backup of your internal disk on a firewire drive. Do this using SuperDuper! or a similar tool, and make sure you can really boot from the backup drive.

No really, do not go on until you have successfully booted from your backup and made sure it works.

Set the startup disk

Put your Leopard installation disk in your DVD slot, or copy it onto a firewire drive if your Cube can't read DVDs. Then set the installation disk as your Startup Disk in the System Preferences so that on next restart your Cube will boot from it and start the installation.

Modify Open Firmware

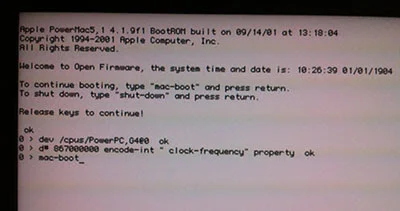
Restart your Cube, and hold Cmd-Opt-O-F during boot to enter the Open Firmware prompt. You will now temporarily set the reported CPU speed to 867 MHz and then continue booting. To accomplish this you will type some commands on the prompt, Open Firmware will respond with an 'ok' message after each understood command. The reported speed will revert back to the original value after next reboot.

For single CPU systems type the following three commands exactly as shown.

dev /cpus/PowerPC,G4@0

d# 867000000 encode-int " clock-frequency" property

mac-boot

For dual CPU systems use the following five lines.

dev /cpus/PowerPC,G4@0

d# 867000000 encode-int " clock-frequency" property

dev /cpus/PowerPC,G4@1

d# 867000000 encode-int " clock-frequency" property

mac-boot

Continue with the installation normally, and eventually end up with a Leopard Cube.

Thanks to MacRob on CubeOwner.com for turning me onto this solution.

Using Mono for .NET development on the Mac

Yesterday I decided to install Mono onto my MacBook to enable .NET development. Below I have listed the steps I took to accomplish compiling and running a Windows Forms hello world style application and packing it into an app bundle so I can run it by double clicking the icon.

The reasons for doing this are twofold;

* I spend most of my time at work professionally developing .NET applications using Visual Studio, so obviously I'm interested in using .NET also on the Mac.

* I'm thinking of writing an experimental Push Notification Service backend in .NET and would rather avoid having to launch Windows to do this.

Requirements

Leopard (Supposedly works on Tiger as well, but then you need to install X11 to make Windows Forms applications work)

Installation

1. Get Mono for Mac from the Mono Project website. I grabbed version 2.4, the latest stable version as of this article's publication.

2. Run the installer. Mono installs under '/Library/Frameworks/Mono.framework'.

Hello World on the command line

3. Compile a command line hello world tool:

hello.cs file contents

// Compile with %> gmcs hello.cs
using System;
public class HelloWorld
{
static public void Main ()
{
Console.WriteLine ("Hello Mono World");
}
}

Compile using the 'gmcs hello.cs' terminal command.

4. Run using the 'mono hello.exe' terminal command. The 'Hello Mono World' message should be printed.

Windows Forms Hello World

5. Compile a Windows Forms hello world app tool.

helloforms.cs file contents

// Compile with %> gmcs helloforms.cs /r:System.Windows.Forms.dll
using System;
using System.Windows.Forms;
public class HelloWorld : Form
{
static public void Main ()
{
MessageBox.Show("Hello Mono World");
}
}

Compile using 'gmcs helloforms.cs /r:System.Windows.Forms.dll'.

6. Run using the 'mono helloforms.exe' terminal command, and if all is well a message box should be displayed.

Creating an app bundle

7. Use MacPack to package the .NET assembly into an app bundle, which can be launched from the Finder.

'macpack -n:HelloForms -a:helloforms.exe -o:. -m:winforms' on the command line.

8. Launch the app bundle HelloForms.app from the Finder to make sure it works.

That's it really. You are now ready to start development on your enterprise level .NET project using Mono on your Mac.

Additional tips

* MacPack has a really good man page documenting its use.

http://linux.die.net/man/1/macpack, or just 'man macpack' on the command line.

* Simplified compilation using pkg-config

Note that using pkg-config (see if it's setup on your system by running 'pkgconfig' on the command line) you can compile the forms app using 'gmcs helloforms.cs -pkg:dotnet' instead. Not a big difference in this example, but not having to list all needed assemblies will help when compiling more complex projects.

For .NET 3.5 compatibility, you would use the -pkg:dotnet35.

To set it up, add the following line to the '~/.bash_profile' file, if the file does not exist create it:

export PKG_CONFIG_PATH=/Library/Frameworks/Mono.framework/Versions/Current/lib/pkgconfig/

References

Windows.Forms and Mac OS/X
http://oepapel.blogspot.com/2005/04/windowsforms-and-mac-osx.html

Mono Basics
http://mono-project.com/Mono_Basics

Customizing Terminal when Compiling Mono apps
http://dotmac.rationalmind.net/2008/12/customizing-terminal-when-compiling-mono-apps/

Archive for the 'firefox' Category
(contains info about pkg-config)
http://wp.colliertech.org/cj/?cat=9

iPhone SDK development on multiple computers

Sometimes it's good to be able to use several computers to develop your iPhone app. In my case my main development machine is the iMac, but summer is coming up and I may not want to stop developing just because I go out of town. Luckily I have a MacBook, on which I have also installed the iPhone SDK.

In order to test on the device when I develop using the MacBook I have to move my certificate, private key and provisioning profile to it. Here's how I do that.

1. Launch Keychain Access on the iMac (main development computer).

2. Under the Keys category I Ctrl-click the private key that has the certificate for 'iPhone Developer: ' attached to it.

3. In the context menu select 'Export ...'.

4. When saving provide a password, which will be required for importing on the other computer.

5. A .p12 file was saved, transfer it to the target computer.

6. Grab the development provisioning profile (either by downloading from the iPhone Program Portal or by grabbing the right one from ~/Library/MobileDevice/Provisioning Profiles/) and transfer it to the target computer.

7. Double click the .p12 file on the target computer. If you provide the correct password the key and certificate will be installed into the Keychain on the target computer.

8. Drag the provisioning profile onto the Xcode dock icon.

The application can now be installed on the device from the target computer, which in my case is the lovely black MacBook.

And off we go!

So Amazon shipped Aaron Hillegass's book across the Atlantic in record time and I'm already one chapter in. I took some time yesterday to watch the CocoaHeads Best of Both Worlds video before diving in.

What I take away from the video presentation is to always respect the user's space, to keep it simple and to put an extraordinary amount of thought into getting the GUI just right.

The book (Cocoa Programming for Mac OS X) so far seems to be just what the doctor ordered, but I'll withhold my recommendation until I'm at least half way in.

Summer reading

Scott Stevenson points out that the third edition of Aaron Hillegass' book Cocoa Programming for Mac OS X has been released. Since it appears to be a sort of Cocoa newbie bible I went ahead and ordered it immediately. The affordable price also helps of course.

Let's call this my first major step towards becoming proficient in Cocoa. Now I know what to do with my summer vacation after the Euro 2008 finals have played out.

An introduction

Okay, so here's the deal.

I am a full time Windows application developer for a multinational software company. I love my job, I really truly do.

But. It's purely Windows and .NET.

In the last few years I have migrated my private life over to the Mac. My only regret is not making the move sooner, Macs are just the most amazing machines.
Being a developer I am obviously interested in learning about Mac-development using Cocoa, Objective C and Xcode, but I have had a hard time finding the time to really get into it. I hope starting this blog to keep a journal of my progress will help push me along.

Obviously, since I have plenty of experience of C# and Java I will look into Mac development using those languages as well and type up my experiences right here. Hopefully it will all add up to a collection of interesting tips and thoughts on software development on the Mac.

I am keeping this blog mostly for my own sake, but feel free to drop by to read my musings, and do drop me a comment with your best Mac tips and tricks. 

Oh yeah, I do have another regret; not buying huge amounts of Apple stock once I realized how amazing Apple's products really are.